
Building a Background Removal App with Machine Learning and .NET
February 14, 2025
I've been using Canva for a few years now when I want to create images for content I'm sharing or posting online. The UI is great and they offer a lot of templates for all the different sizes that platforms prefer. It'd been a bit though since I'd used it heavily so when I picked it back up this past month to create thumbnails for the videos I've been posting on my YouTube channel they offered me a free trial of their premium service. I've been using it for the last couple weeks and really the main feature included in their premium service I've been using is their background removal. I know how to do background removal in Photoshop and GIMP, but Canva's makes it so easy and fast with just a click of a button. However with the trial expiring I just can't justify another subscription for a single feature. That is when the engineer in me kicked in and I thought, "Surely I can figure out how to do this myself." So here we are. 😅
Note
The code presented in this post reflects the initial pass I took at building this app. I have since iterated it a bit and turned it into a proper app. You can find the code for it here and you can download the app here. However there is a branch of the code that reflects the code presented in this post here.
Where to Start
I've done a small bit of image manipulation like this previously when taking this course. We basically implemented the ability to replace the background of an image taken in front of a green screen with a different image. So conceptually I have a grasp on how to work with an image and its pixels. However, for much of my use cases I am not needing to replace a background, but actually determine what is the background in an image and remove it. This way I can layer the subject of the image on top of a different background. So what do you do when you don't know how to do something? You get to learning. I started with a Google search and quickly realized this is a broad and deep topic that has entire fields of study dedicated to it. In general though, there are two main approaches to the problem:
- traditional techniques that rely on handcrafted heuristics around pixel colorrs and shapes to determine the background of an image
- machine learning techniques that rely on training a model on a large image dataset and optimizing it to perform a particular task on the images such as background removal.
I ended up coming to the conclusion that to have something that closely approximates the capabilities I've come to enjoy in Canva I'd need to lean in towards the machine learning approach. Mainly because the images I'm removing backgrounds from are not taken in front of any type of solid color background. They are taken in the wild so to speak and therefore I need something that can generalize well to a variety of backgrounds. The only real viable solution for this is to use a machine learning model that has been trained on a large dataset of images.
Finding a Model
As I mentioned above this is a deep topic and there is a whole bunch of really smart and talented individuals that have dedicated their careers to this. So I figured there is a good chance someone has already done the hard work of training a model on a large dataset and made it available for use. I started with a Google search and quickly found there a few - call them industry standard - models that have been trained for this task. The three I added to my list to test using were:
Now I'm not a machine learning expert, but I do want to share with you the understanding I've come to of these models as it's important to understanding how I approached building my app. At their core these models are well practiced at "looking" at an image and identifying patterns. Each one was trained to identify different patterns, but all can sort of be used to get at separating what is the foreground and what is the background of an image. These models get good at doing this by being shown large numbers of images, asked to predict or identify the target pattern, and then receiving feedback on whether they've done so correctly. Here is a diagram that helps clarify the models training processes at a high level:
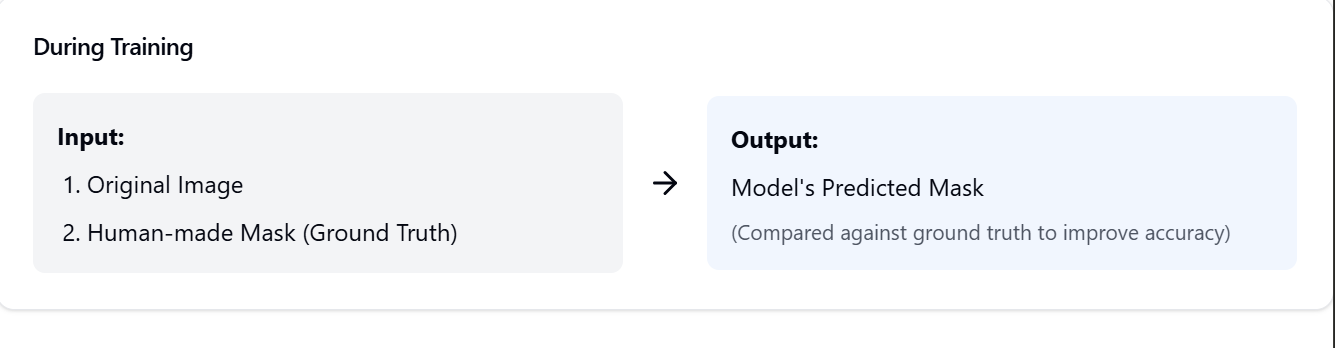
This means that to actually use the model to remove a background from a target image you need to do three things:
- Preprocess the image into a format the model can understand
- Run the model against that preprocessed image to produce a predicted mask
- Postprocess the image by apply the predicted mask to the original image
Working with the Models
At this point though you probably have the same question I had. The model doesn't actually have eyes. It can't "look" at the image like you and me so how is the target image represented to the model and how is the resulting mask represented back to us? And how do we convert between our image and the model's representations. The answer is Tensors. A tensor is a mathematical object that is a generalization of scalars, vectors, and matrices. In the context of machine learning, tensors are used to represent data in a way that can be processed by the model. In the case of these models, generally the input tensor is a 3D tensor that represents the pixel values of the image in a specific format. The output tensor is a tensor that represents the predicted mask, where each value corresponds to a pixel in the input image and indicates whether it belongs to the foreground or background.
For example, the input tensor for a 256x256 image would be a 3D tensor with shape (256, 256, 3), where the last dimension represents the RGB color channels. Something like:
[
  [
    [255, 0, 0],
    [0, 255, 0],
    [0, 0, 255]
  ],
  [
    [255, 255, 0],
    [0, 255, 255],
    [255, 0, 255]
  ]
]
The output tensor for the same image would be a tensor, where each value is an unbounded float that indicates the model's confidence that the corresponding pixel in the input image belongs to the foreground. Something like:
[
  [0.1, 0.9, 0.8],
  [0.7, 0.2, 0.6]
]
We will then need to apply a sigmoid function to the output tensor to conver the values to a range of 0 to 1. This will allow us to create a binary mask that we can use to separate the foreground from the background in the original image.
Note
If you aren't familiar with what a sigmoid function is, it's just a mathematical function that takes a real number maps it to a value between 0 and 1.
Again, I'm probably not describing the specifics of each of the models precisely, but this is the general idea and how I built a working mental model of what exactly the models were doing and how I'd need to interact with them in my app.
Building the App
Okay so I've identified the models I want to test and I've built an okay mental model of how they work and how I'll need to pass data to and from them. But I still needed to sort out how do I get the models on to my computer, into my app, and predicting masks. Obviously this is another job for my "google-fu" skills.
I knew I wanted to use a .NET console app that I could run in my terminal to do the actual background removal so I started searching for how to run machine learning models in C#. Where I ended up was here - onnxruntime. The onnxruntime is a cross-platform, machine-learning model accelerator that is designed to be used with the ONNX (Open Neural Network Exchange) format. It's built and maintained by Microsoft and they offer an implementation of it in C# making it a perfect candidate for my app. The ONNX format is an open standard for representing machine learning models, and it allows you to use models trained in one framework (like PyTorch or TensorFlow) in another framework (like ONNX Runtime). This all meant that if I could find the models I wanted to use in the ONNX format I could use them in my .NET console app.
Finding the models in this particular format was awesomely easy. I just searched for the model name and "onnx" and found them all on huggingface.co. Here are the links to the models I used:
At this point I was ready to start trying to stich my idea together and see if it would work.
Setting Up the Project
The first thing I did was create a new .NET console app. I used the following command to do this:
dotnet new console -o BGR.Console
cd BGR.Console
Next I added the onnxruntime NuGet package to the project. I used the following command to do this:
dotnet add package Microsoft.ML.OnnxRuntime
I also need a package that would work cross-platform to manipulate images. If you aren't familiar with the .NET ecosystem there are a few different libraries that are used for this, but the most common I think is ImageSharp. I used the following command to add it to my project:
dotnet add package SixLabors.ImageSharp
From here I had a working .NET console app all I needed to do was implement those same three steps I mentioned above to actually get the background removed from an image.
Note
The code snippets that follow often reference a method called WalkImage. This is a helper method I created to iterate over the pixels of an image. Here is the code for it:
static void WalkImage(int height, int width, Action<int, int> action)
{
  for (var y = 0; y < height; y++)
  {
    for (var x = 0; x < width; x++)
    {
      action(x, y);
    }
  }
}
Implement Preprocessing
The main goal of this step is to transform the image that the application is given into a format that the model can understand. This involves resizing the image to the correct dimensions, normalizing the pixel values, and converting the image to a tensor. The specific size and values used for normalization depend on the model. I mainly used the model cards on huggingface.co to determine the correct values to use. Here is an example of the preprocessing code I implemented with values specific to the U^2-Net model:
static DenseTensor<float> CreateTensorInput(Image<Rgba32> image)
{
  // U2Net expects input images to be 320x320. This is dependent on the model.
  const int targetWidth = 320;
  const int targetHeight = 320;

  // ImageNet normalization parameters
  // source:
  // - https://www.image-net.org/
  // - https://pytorch.org calculated these values from the ImageNet dataset
  // and they are commonly used for models trained on ImageNet so we use them here
  // to normalize the input image to better match the distribution of the data the model was trained on
  // NOTE: These values are not universal and may vary for different models
  const float rMean = 0.485f;   // Mean value for Red channel
  const float gMean = 0.456f;   // Mean value for Green channel
  const float bMean = 0.406f;   // Mean value for Blue channel
  const float rStd = 0.229f;    // Standard deviation for Red channel
  const float gStd = 0.224f;    // Standard deviation for Green channel
  const float bStd = 0.225f;    // Standard deviation for Blue channel
  const float pixelMax = 255f;  // Maximum pixel intensity for normalization

  // Create a temporary image for preprocessing
  using var resized = image.Clone();
  resized.Mutate(x => x.Resize(targetWidth, targetHeight));

  // Create tensor of shape (1, 3, 320, 320)
  // 1 for batch size, 3 for RGB channels, 320x320 for image dimensions
  DenseTensor<float> tensor = new([1, 3, targetHeight, targetWidth]);

  // Normalize pixel values and copy to tensor
  WalkImage(resized.Height, resized.Width, (x, y) =>
  {
    var pixel = resized[x, y];

    // u2net expects expect input images to be normalized using ImageNet mean and std
    // to better match the distribution of the data the model was trained on
    // Normalize to range [0, 1] and standardize using ImageNet mean/std
    // The tensor is filled with normalized pixel values
    tensor[0, 0, y, x] = ((pixel.R / pixelMax) - rMean) / rStd; // Red channel
    tensor[0, 1, y, x] = ((pixel.G / pixelMax) - gMean) / gStd; // Green channel
    tensor[0, 2, y, x] = ((pixel.B / pixelMax) - bMean) / bStd; // Blue channel
  });

  return tensor;
}
With that I can now convert an image to a tensor that the model can understand.
Implement Mask Generation
The next step is to pass the input tensor we've created to the model and have it actually run an inference to generate a tensor that we can translate back into an image mask. The one rabbit hole though I ended up falling down here was deciding on a thresholding strategy for the model's output. Remember the model's output is a tensor of unbounded floats that represent the model's confidence that a pixel belongs to the foreground. We are going to convert these values to a binary mask by calculating a sigmoid value for each pixel. This will give us a value between 0 and 1 for each pixel.
However we then need to decide what values or in other words what pixels we will keep and what pixels we will remove. There seems to be quite a few strategies all of which range in complexity, but I decided to start with the simplest which is just a fixed threshold value that is right in the middle of the range. This means that any pixel with a value greater than 0.5 will be kept and any pixel with a value less than or equal to 0.5 will be removed. You'll also note that before handing the mask back we resize it to the original image dimensions. This way we can apply the mask to the original image. Here is the code I implemented to generate the mask:
static Image<Rgba32> GenerateMask(Tensor<float> maskTensor, int width, int height)
{
  var mask = new Image<Rgba32>(width, height);

  var sourceHeight = maskTensor.Dimensions[2]; // Height of the original tensor mask
  var sourceWidth = maskTensor.Dimensions[3];  // Width of the original tensor mask

  using Image<Rgba32> tempMask = new(sourceWidth, sourceHeight);

  // Sigmoid function parameters
  const float sigmoidScale = 1f;    // Scaling factor for sigmoid activation
  const float sigmoidShift = 1f;    // Shift factor in the denominator of the sigmoid function
  const float sigmoidDivisor = -1f; // Multiplier for the exponent in the sigmoid function

  static float CalculateSigmoid(float x)
  {
    return sigmoidScale / (sigmoidShift + MathF.Exp(sigmoidDivisor * x));
  }

  const float binarizationThreshold = 0.5f; // Threshold to determine foreground vs. background
  const float normalizationFactor = 2f;     // Scales the thresholded value to enhance contrast

  // Pixel intensity values
  const byte maxIntensity = 255;  // Maximum grayscale intensity
  const byte opaqueAlpha = 255;   // Fully opaque alpha value


  WalkImage(sourceHeight, sourceWidth, (x, y) =>
  {
    // a sigmoid function is a function that produces an S-shaped curve
    // it is often used in machine learning and statistics to model probabilities
    // the sigmoid function is defined as:
    // f(x) = 1 / (1 + e^(-x))
    // where e is the base of the natural logarithm and x is the input value

    // the raw tensor values for our mask are going to be real unbounded numbers
    // i.e. -1.5, 0.5, 2.0, etc.
    // the sigmoid function will map these values to a range between 0 and 1
    // this allows us to say that value closer to 0 is background and value
    // closer to 1 is foreground
    var sigmoidValue = CalculateSigmoid(maskTensor[0, 0, y, x]);

    // now we want to threshold the sigmoid value to determine if it is foreground or background
    // we are arbitrarily choosing 0.5 as the threshold. so if the sigmoid value is greater than
    // 0.5 we will consider it foreground and if it is less than 0.5 we will consider it background

    // when a sigmoid value is greater than 0.5 we will subtract the threshold from it
    // and multiply it by 2 this way the intensity value will be larger for values closer to 1
    // and create more contrast in the mask
    var normalizedValue = sigmoidValue > binarizationThreshold
        ? (sigmoidValue - binarizationThreshold) * normalizationFactor
        : 0f;

    // Convert to an 8-bit grayscale intensity
    var intensity = (byte)(normalizedValue * maxIntensity);

    // Store the pixel with full opacity
    tempMask[x, y] = new Rgba32(intensity, intensity, intensity, opaqueAlpha);
  });

  // Resize the mask to match the target dimensions
  tempMask.Mutate(x => x.Resize(width, height));

  // Copy the resized mask to the final output image
  WalkImage(height, width, (x, y) => mask[x, y] = tempMask[x, y]);

  return mask;
}
Note
This code can look intimidating, but I promise you that it did not come out of me in one fail swoop as it is presented here. I had to labor over it.
Implement Postprocessing
The final step is to apply the mask we generated to the original image. This simply involves iterating over the pixels of the original image, mapping the each pixel to a pixel in the mask, and then setting all background pixels to a transparent pixel. Remember the mask is a black and opaque map of the image where the black pixels are the background and the opaque pixels are the foreground so we evaluate the mask's pixel value using an alpha threshold. Here is the code I implemented to do this:
static Image<Rgba32> GetImageWithBackgroundRemoved(Image<Rgba32> image, Image<Rgba32> mask)
{
  Image<Rgba32> result = new(image.Width, image.Height);

  const byte alphaThreshold = 20;
  Rgba32 transparentPixel = new(0, 0, 0, 0);

  WalkImage(image.Height, image.Width, (x, y) =>
  {
    var sourcePixel = image[x, y];
    var maskPixel = mask[x, y];

    var alpha = maskPixel.R;

    result[x, y] = alpha > alphaThreshold
      ? new Rgba32(sourcePixel.R, sourcePixel.G, sourcePixel.B, sourcePixel.A)
      : transparentPixel;
  });

  return result;
}
Putting It All Together
At this point we have all the major computation pieces we need to remove the background from an image. The last thing we need to do is put it all together in a way that we can run from the command line. I started simple with just the following:
if (args.Length < 1)
{
  Console.WriteLine("Usage: BackgroundRemover <input_image_path>");
  return;
}

var inputImagePath = args[0];
var maskImagePath = Path.ChangeExtension(inputImagePath, null) + "_mask.png";
var outputImagePath = Path.ChangeExtension(inputImagePath, null) + "_no_bg.png";

try
{
  var assembly = Assembly.GetExecutingAssembly();
  var resourceName = "BGR.Console.u2net.onnx";

  using var stream = assembly.GetManifestResourceStream(resourceName) ?? throw new FileNotFoundException("Model not found in embedded resources.");
  var modelBytes = new byte[stream.Length];
  stream.ReadExactly(modelBytes);

  using var image = Image.Load<Rgba32>(inputImagePath);
  var inputTensor = CreateTensorInput(image);

  using var options = new SessionOptions() { LogSeverityLevel = OrtLoggingLevel.ORT_LOGGING_LEVEL_ERROR };
  using InferenceSession session = new(modelBytes, options);
  var inputs = new List<NamedOnnxValue>()
  {
    NamedOnnxValue.CreateFromTensor(session.InputNames[0], inputTensor),
  };

  using var results = session.Run(inputs);
  var outputTensor = results[0].AsTensor<float>();

  using var mask = GenerateMask(outputTensor, image.Width, image.Height);

  using var bgRemoved = GetImageWithBackgroundRemoved(image, mask);

  var encoder = new PngEncoder { CompressionLevel = PngCompressionLevel.BestCompression };

  mask.Save(maskImagePath, encoder);
  bgRemoved.Save(outputImagePath, encoder);

  Console.WriteLine($"Background removed and saved to {outputImagePath}");
}
catch (Exception ex)
{
  Console.WriteLine($"Error: {ex.Message}");
  throw;
}
Couple things to point out here. First is you'll note that the model is embedded in the assembly. This is a great way to package the model with the app so that it can be run anywhere without needing to worry about where the model is located. I used the following in my .csproj file to embed the model:
<ItemGroup>
  <EmbeddedResource Include="u2net.onnx" />
</ItemGroup>
The other thing to point out is that the onnxruntime library actually does recommend using a newer API that is based around an OrtValue type. I didn't use it here because I couldn't find a good example of how to apply it when doing direct manipulation of the tensor values. However if someone comes across this and can help sort me out I'd love to here from you.
Testing the App with Different Models
Otherwise though this got me to a place where I could actually start testing out how well the model worked at removing backgrounds from images. Remember there are some constant values in the code above that are specific to each model so when testing I did manually swap those out and also included the other models as embedded resources in the project.
Let's take a look at how well each model performed.
U^2-Net
This ran in 4296ms on my machine.
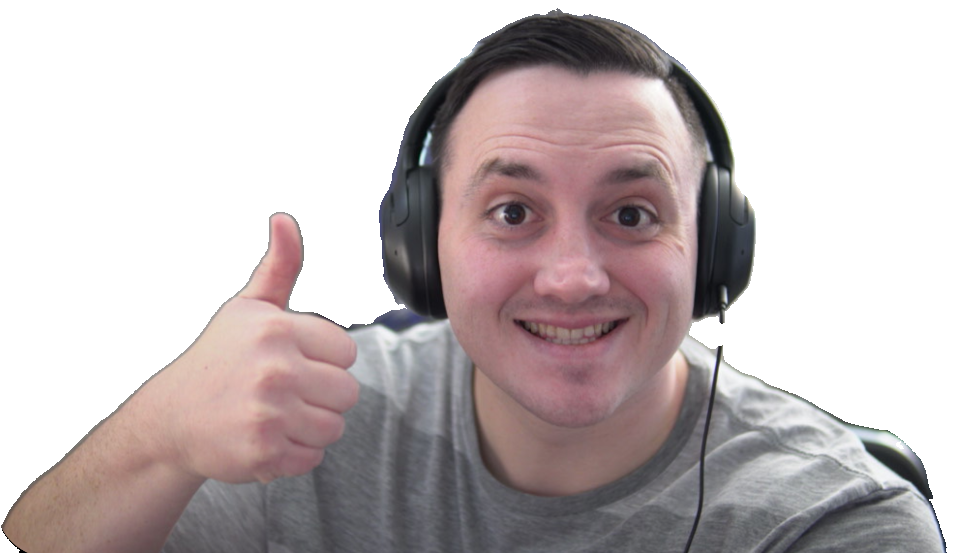
Test Image

Mask Image
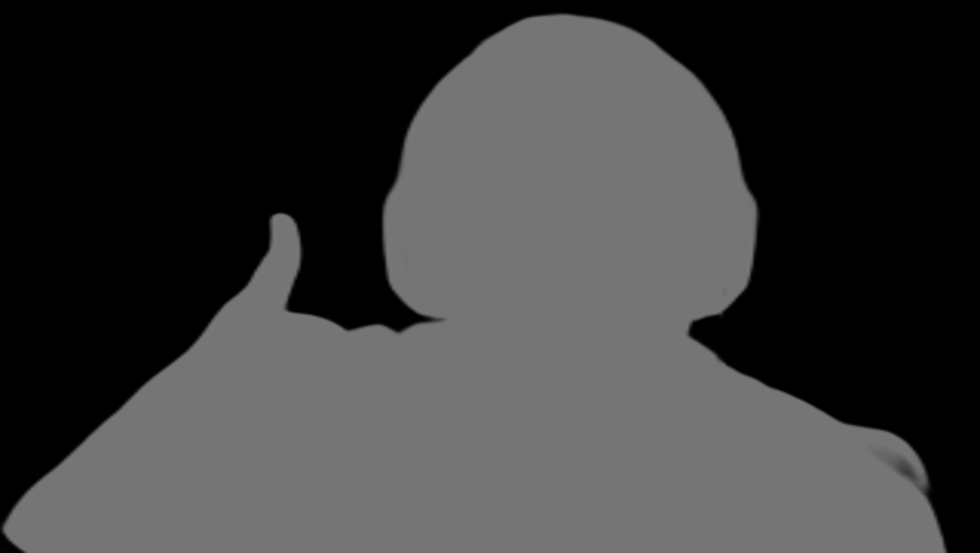
Output Image
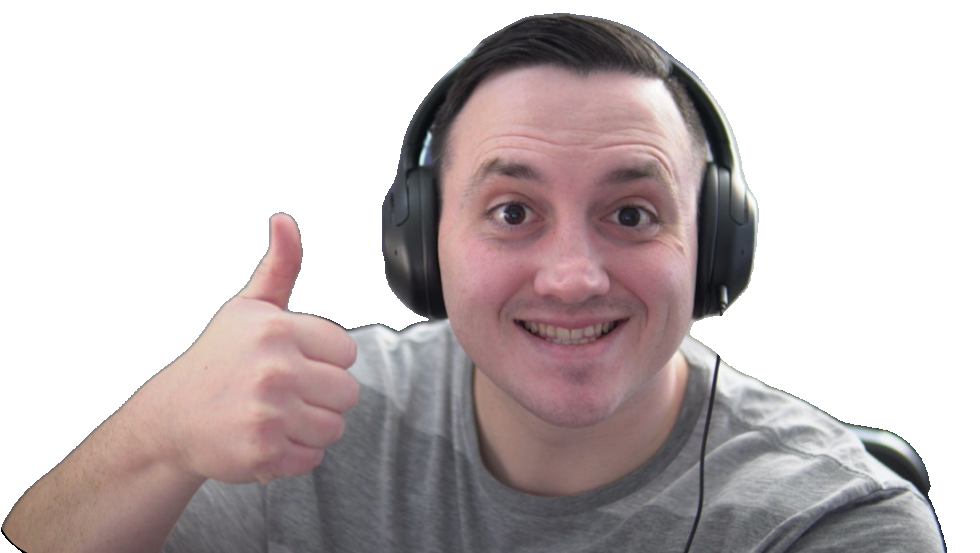
MODNet
This ran in 3276ms on my machine.
Test Image
Mask Image
Output Image
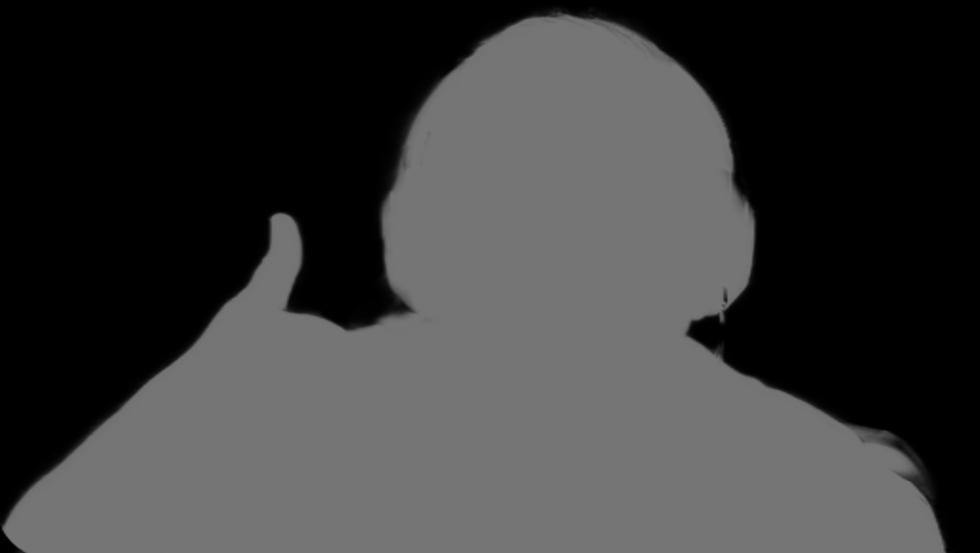
RMBG
This ran in 87529ms on my machine.
Note
I'm not sure exactly why this model takes so much longer than the others to run. I mean it does take input images that are twice the size of the other models. I did find that it produced warnings while running which is why I set the LogSeverityLevel to ORT_LOGGING_LEVEL_ERROR. Based on some googling it seems like their could be an issue in the onnxruntime related to some optimizations that are causing the warnings so perhaps this is related to the performance. If you have more insight to offer I'd love to hear from you.
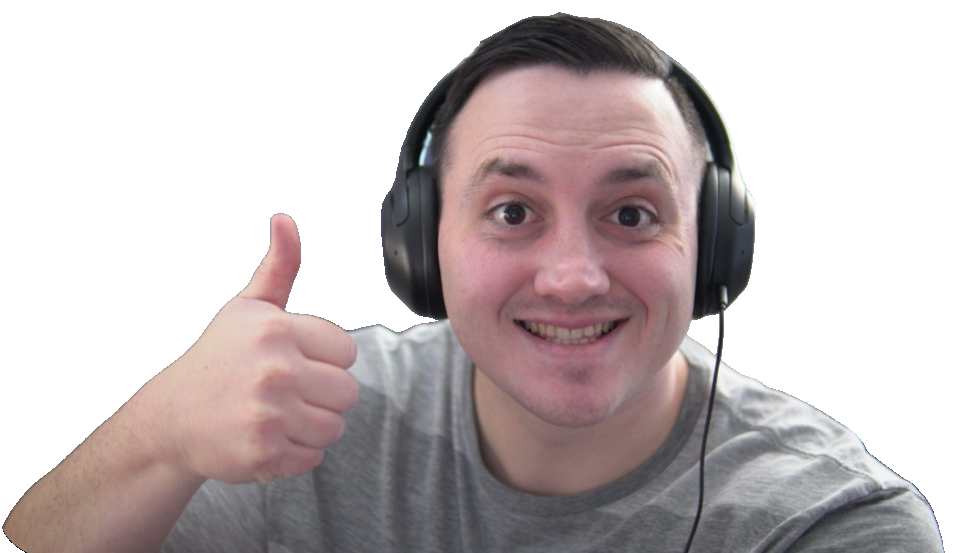
Test Image
Mask Image

Output Image
Conclusion
I was really pleased how all the models performed. I did experiment with some different images and the results were pretty consistent across the board with each model, but it did seem like the RMBG model gave the best results. It's also the slowest though however for my use case I think it isn't a deal breaker. I do think there is probably some room for improvement around the edges of the output image. I think if I used a more sophisticated thresholding strategy for the alpha values when applying the mask I could get better results. Regardless I'm pretty satisfied with the results and it makes for a perfectly suitable replacement for how I was using Canva's background removal feature.
If you stuck with me this far I hope you found this helpful. If you have any questions or suggestions you can find me on Bluesky.
